Dive Deep: Unveiling DevExpress Splash Screen in Your Winforms App

Introduction:

In today's fast-paced digital world, user experience plays a pivotal role in the success of any application. One aspect that significantly contributes to a positive user experience is the loading screen or splash screen. A well-designed splash screen enhances the aesthetic appeal of your application and provides users with visual feedback during the loading process, reducing perceived wait times.

In this tutorial, we'll explore implementing a splash screen in a Winforms application using DevExpress, a powerful suite of UI controls and components. By the end of this tutorial, you'll have a sleek and professional-looking splash screen integrated into your Winforms application, enhancing its overall user experience.

Step 1: Setting Up Your Winforms Project

Before implementing the DevExpress splash screen, let's set up a basic Winforms project in Visual Studio.

  1. Open Visual Studio and create a new Winforms project.
  2. Name your project and choose a location to save it.
  3. Once the project is created, you'll see the default form in the designer view.

Step 2: Installing DevExpress

You must install the DevExpress NuGet package to use the DevExpress controls and components in your Winforms project.

  1. Right-click on your project in Solution Explorer.
  2. Select "Manage NuGet Packages" from the context menu.
  3. In the NuGet Package Manager, search for "DevExpress" and install the appropriate package for your project.

Step 3: Adding a Splash Screen Form

Now, let's create a new form for our splash screen.

  1. Right-click on your project in Solution Explorer.
  2. Select "Add DevExpress Item" from the context menu.
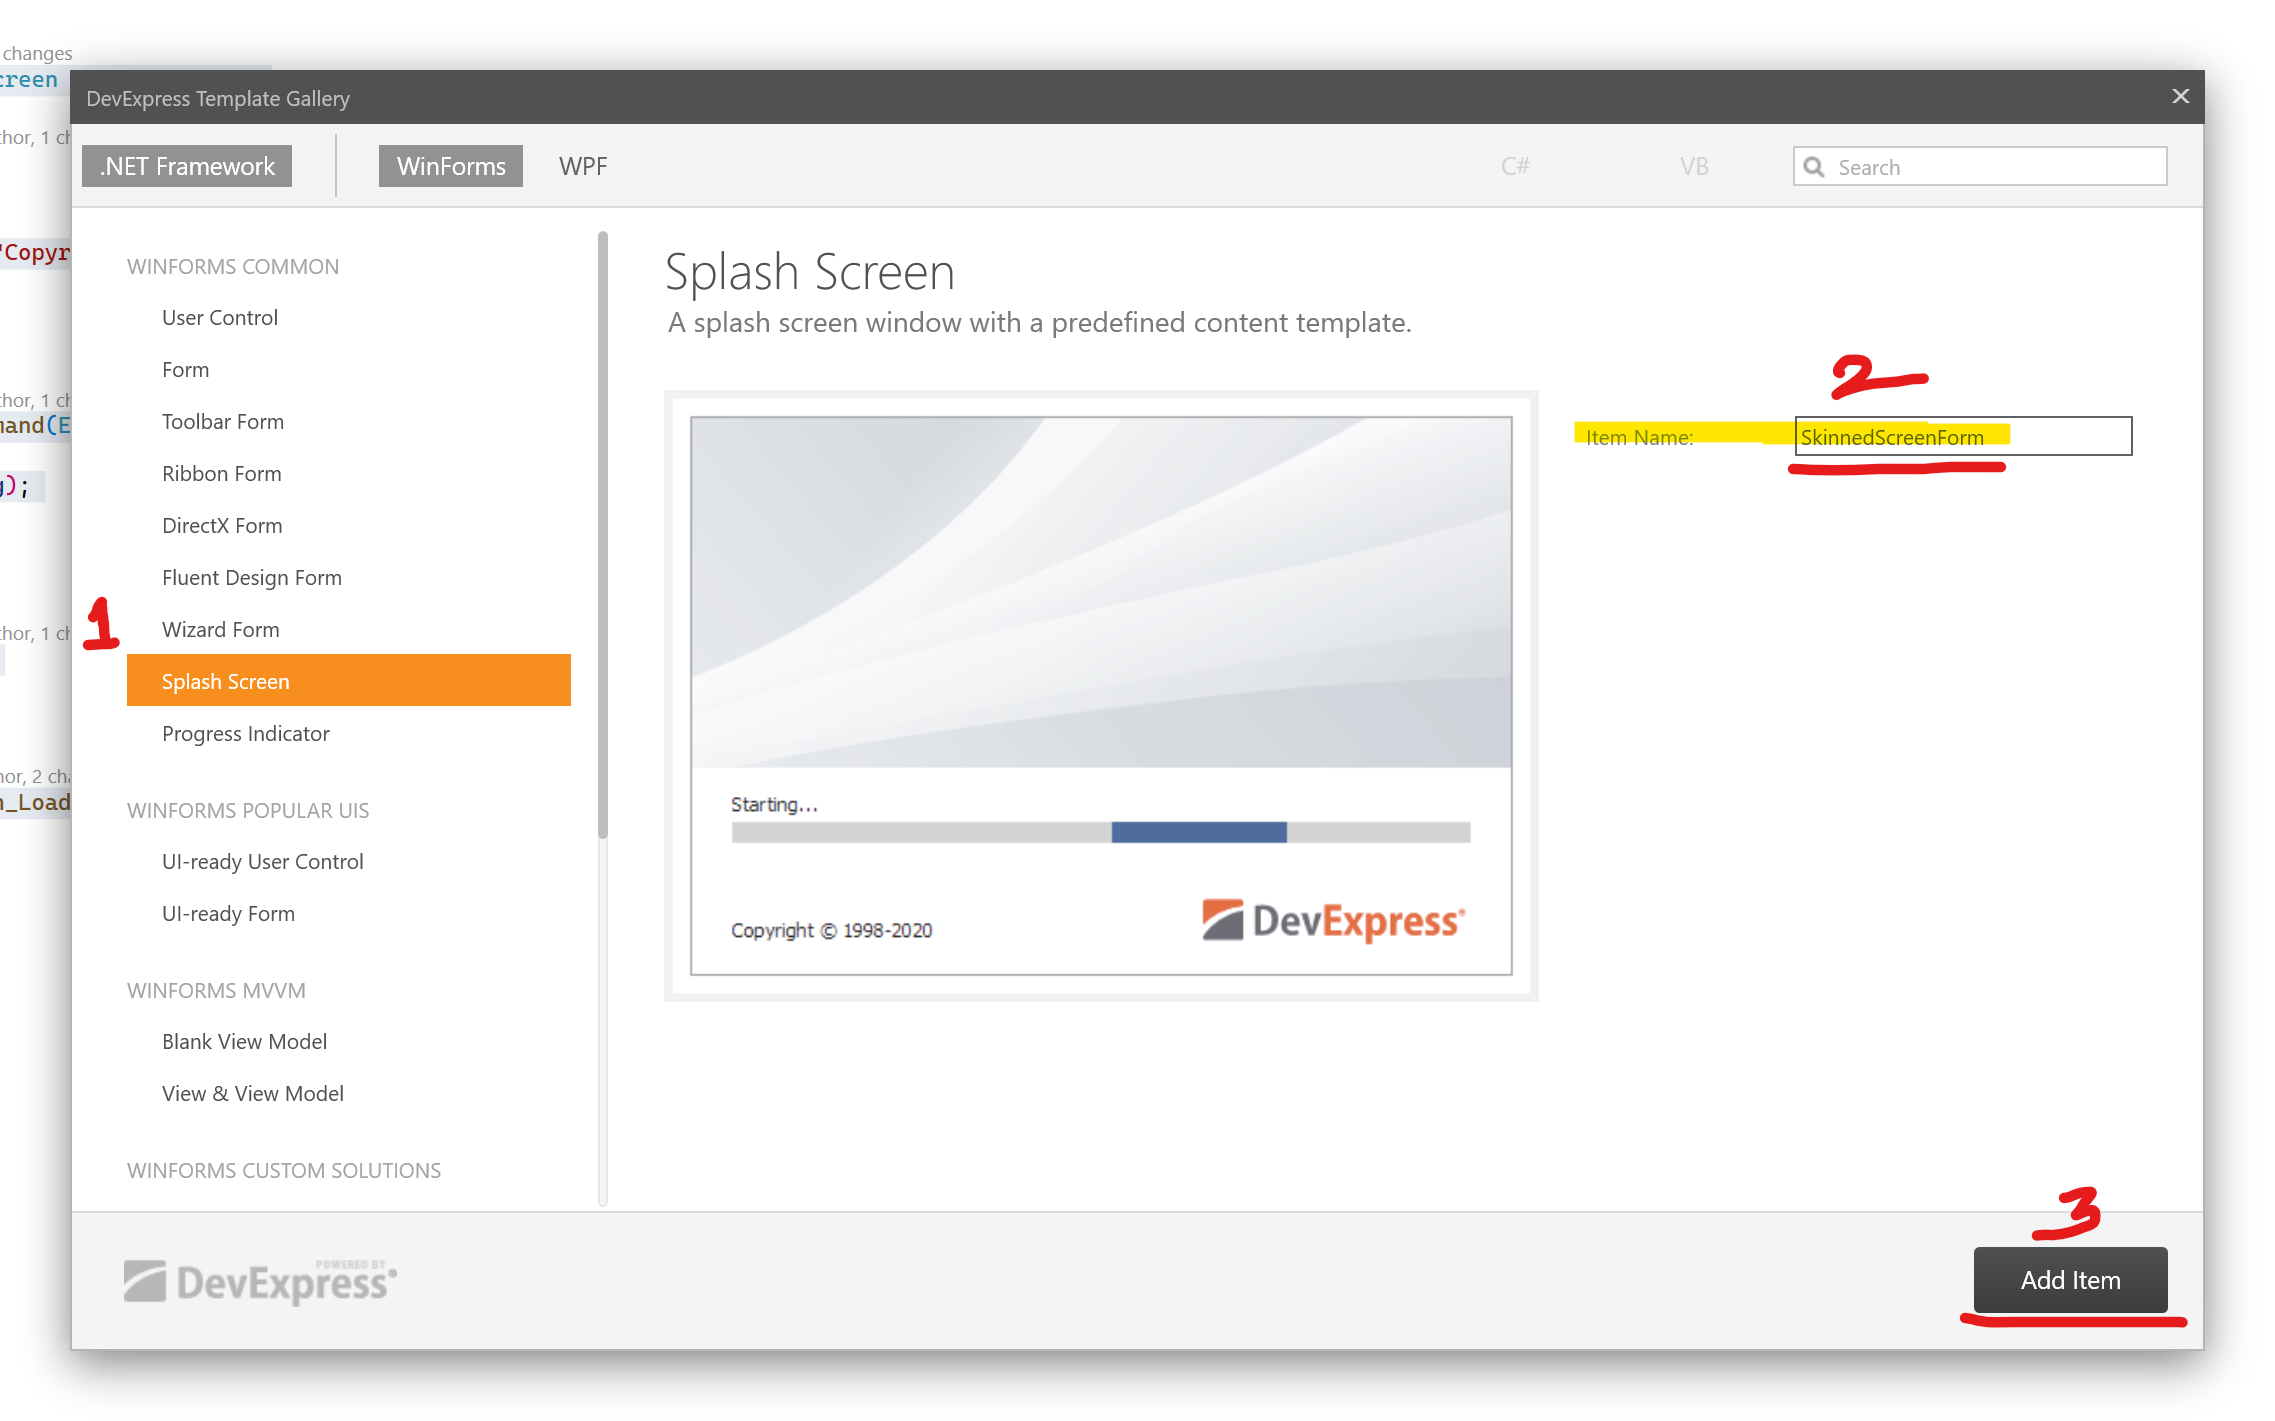
  3. Select "Splash Screen" from the DevExpres Template Gallery.
  4. Name the form "SplashScreenForm" and click "Add Item"
  5. Design your splash screen form using DevExpress controls to customize its appearance according to your preferences. You can add images, animations, and progress indicators to make it visually appealing.

Step 4: Configuring Application Startup

Next, we must configure our application to display the splash screen during startup.

  1. Open the Program.cs file in your project.

  2. Locate the Application.Run method, typically found within the Main method.

  3. Before calling Application.Run, create and display an instance of your splash screen form.

     static void Main()
     {
         Application.EnableVisualStyles();
         Application.SetCompatibleTextRenderingDefault(false);
     
         //Application.Run(new MainFormWithSplashScreenManager());
         var form = new MainForm();
         DevExpress.XtraSplashScreen.SplashScreenManager.ShowForm(form, typeof(SkinnedSplashScreen));
         //...
         //Authentication and other activities here
         Bootstrap.Initialize();                        
     
         DevExpress.XtraSplashScreen.SplashScreenManager.CloseForm();                      
         Application.Run(form);
     }
    
     internal class Bootstrap
     {
         internal static void Initialize()
         {
             // Add initialization logic here
             //Authentication and other activities here
             LoadResources();            
             
         }
         private static void LoadResources()
         {
             // Perform resource loading tasks
             // Example: Load configuration settings, connect to a database, etc.
    
             Thread.Sleep(1000);//For testing
         }
     }
     

Step 5: Adding Splash Screen Logic

Now that our splash screen is displayed during application startup let's add some logic to control its behaviour.

  1. Open the SplashScreenForm.cs file.

  2. Add any initialization logic or tasks that must be performed while the splash screen is displayed. For example, you can load resources, perform database connections, or initialize application settings.

     public partial class SkinnedSplashScreen : SplashScreen
     {
         public SkinnedSplashScreen()
         {
             InitializeComponent();
             this.labelCopyright.Text = "Copyright © 1998-" + DateTime.Now.Year.ToString();
         }
    
         #region Overrides
    
         public override void ProcessCommand(Enum cmd, object arg)
         {
             base.ProcessCommand(cmd, arg);
         }
    
         #endregion
    
         public enum SplashScreenCommand
         {
         }
    
         private void SkinnedSplashScreen_Load(object sender, EventArgs e)
         {
             
         }
     }
     

Step 6: Testing Your Application

With the splash screen implemented, it's time to test your Winforms application.

  1. Build your project to ensure there are no compilation errors.
  2. Run the application and observe the splash screen displayed during startup.
  3. Verify that the application functions correctly after the splash screen closes.

See the following topic for information on how to execute code when your application starts: How to: Perform Actions On Application Startup.

Conclusion:

In this tutorial, we've learned how to implement a splash screen in a Winforms application using DevExpress. By following these steps, you can enhance the user experience of your application by providing visual feedback during the loading process. You can customize the splash screen further to match the branding and style of your application and experiment with different animations and effects to create a memorable first impression for your users.

References
Splash Screen
Splash Screen Manager

Source Code

How disable path editing in BreadCrumbEdit control?

Recently I have implemented DevExpress BreadCrumbEdit control in my application and in the implementation I need to disable editing of the path in the control. In technical words, I need BreadCrumbEdit control in only Select mode rather the Edit Mode. Initially it can be set using the BreadCrumbEdit’s BreadCrumbMode property to “Select”.
I found one solution that it is impossible to prevent switching to the Edit mode. The easiest way DevExpress guys suggest that handle the BreadCrumbEdit's PropertiesChanged event and reset it back to “Select” if it try to go in the “Edit” mode. So I did it in the following manner:

C#

private void breadCrumbEdit1_PropertiesChanged(object sender, EventArgs e)
{
    if (breadCrumbEdit1.Properties.BreadCrumbMode == BreadCrumbMode.Edit)
    {
        breadCrumbEdit1.Properties.BreadCrumbMode = BreadCrumbMode.Select;
    }
}

VB

Private Sub breadCrumbEdit1_PropertiesChanged(sender As Object, e As EventArgs)
    If breadCrumbEdit1.Properties.BreadCrumbMode = BreadCrumbMode.Edit Then
        breadCrumbEdit1.Properties.BreadCrumbMode = BreadCrumbMode.Select
    End If
End Sub

How to close a MessageBox after several seconds?

Related to: Close a MessageBox after several seconds.
Scenario:
I need to create a message box or Popup which must be visible for specified time and close automatically after then.

Solution:
There is not inbuilt feature in .net framework to do this. You need to create your custom logic that message box close after a specific time. To do this create a custom message box class which have a timer which close the raised pop message when elapsed time equal to specified time to make it visible to the user.
Here is the custom class:

public class AutoClosingMessageBox {
    System.Threading.Timer _timeoutTimer;
    string _caption;
    AutoClosingMessageBox(string text, string caption, int timeout) {
        _caption = caption;
        _timeoutTimer = new System.Threading.Timer(OnTimerElapsed,
            null, timeout, System.Threading.Timeout.Infinite);
        MessageBox.Show(text, caption);
    }
    public static void Show(string text, string caption, int timeout) {
        new AutoClosingMessageBox(text, caption, timeout);
    }
    void OnTimerElapsed(object state) {
        IntPtr mbWnd = FindWindow(null, _caption);
        if(mbWnd != IntPtr.Zero)
            SendMessage(mbWnd, WM_CLOSE, IntPtr.Zero, IntPtr.Zero);
        _timeoutTimer.Dispose();
    }
    const int WM_CLOSE = 0x0010;
    [System.Runtime.InteropServices.DllImport("user32.dll", SetLastError = true)]
    static extern IntPtr FindWindow(string lpClassName, string lpWindowName);
    [System.Runtime.InteropServices.DllImport("user32.dll", CharSet = System.Runtime.InteropServices.CharSet.Auto)]
    static extern IntPtr SendMessage(IntPtr hWnd, UInt32 Msg, IntPtr wParam, IntPtr lParam);
}

It can be called as below:

AutoClosingMessageBox.Show("Text", "Caption", 1000);
 

How to prevent selection change in drop down from key press when UltraComboEditor’s DropdownStyle set to DropDownList?

Scenario:
Current requirement is that user can select option from drop down from mouse selection only, but whenever use type anything in the drop down it automatically raise control’s ComboBox.SelectionChangeCommitted event with first match that satisfies auto complete condition of the control. As required we need
ignore the key press to raise the ComboBox.SelectionChangeCommitted event of the combo box and it only allow selection only on mouse.

Solution:


To do this, I set the control’s DropdownStyle set to DropDownList, but no work correctly. Along this I have to suppress combo box’s key press by handling KeyDown event as below.

LibraryListDropdown libDropdown = null;
public Form1()
{
    InitializeComponent();
    libDropdown = new LibraryListDropdown();
    this.libDropdown.DropDownStyle = DropDownStyle.DropDownList;
    libDropdown.Name = "cmbObjectType";
    libDropdown.SelectionChangeCommitted += new EventHandler(libDropdown_SelectionChangeCommitted);
    libDropdown.KeyDown += libDropdown_KeyDown;
    this.Controls.Add(libDropdown);
    libDropdown.PopulateLibraries();
}

void libDropdown_KeyDown(object sender, KeyEventArgs e)
{
    e.SuppressKeyPress = true;
}

private void libDropdown_SelectionChangeCommitted(object sender, EventArgs e)
{
    
}

How to open DateTime picker C# control programmatically on Button Click

You have to use interop to to send request to windows that show DataTimePicker 
on click of the button
//include namespace section 
using System.Runtime.InteropServices;

//declares
[DllImport("user32.dll")]
private static extern bool PostMessageForCalender(
IntPtr hWnd, // handle to destination window
Int32 msg, // message
Int32 wParam, // first message parameter
Int32 lParam // second message parameter
);

const Int32 WM_LBUTTONDOWN = 0x0201;

//method to call  calender dropdown
private void button1_Click(object sender, EventArgs e)
{
    Int32 x = dateTimePicker1.Width - 10;
    Int32 y = dateTimePicker1.Height / 2;
    Int32 lParam = x + y * 0x00010000;

    PostMessageForCalender(dateTimePicker1.Handle, WM_LBUTTONDOWN, 1,lParam);

}