How to deploy an Angular app to GitHub Pages

Introduction

In this article, you will learn to deploy an Angular application to GitHub Pages using npm angular-cli-ghpages package to easily.

Prerequisites:

This command has the following prerequisites for Installation & Setup:

  • Node.js 8.2.0 or higher which brings you npm 5.2.0 which brings you npx
  • Git 1.7.6 or higher
  • optional: Angular project created via angular-cli

  • An Angular 5 or above version application, which is working and ready to host. If it is not ready then follow the instructions specified in the below link for adding an existing angular project to GitHub. Adding an existing project to GitHub using the command line

References:

Deploy to GitHub Pages angular-cli-ghpages 
Deploying Angular Apps with GitHub Pages

Steps to deploy to GitHub pages

To install the command run the following:

npm install -g angular-cli-ghpages

It is just two command to publish your Angular application to GitHub pages.

ng build --prod --base-href https://[username].github.io/[repo]/
ngh --dir=dist/

Deploying using the Angular npm scripts

You can also automatically publish an application using npm by setting script in package.json. The build and deploy command in one go by following the below approach:

To install the command as your project dependencies run the following:

npm i angular-cli-ghpages --save-dev

Open your package.json and then, in your script section add the following script to deploy an Angular 7 application.

{
  "name": "ng-webgl",
  "version": "0.0.0",
  "scripts": {
    "ng": "ng",
    "start": "ng serve",
    "build": "ng build",
    "test": "ng test",
    "lint": "ng lint",
    "e2e": "ng e2e",
    "deploy:gh": "ng b --prod --base-href https://niranjankala.github.io/ng-webgl/ && npx ngh --dir=dist/"
  },

To execute this deploy script. Run npm run deploy:gh on the root of your project directory.

Publish Github-pages

Note: In order to compile images correctly use the relative path './assets/images/image.png'

Conclusion

There are the steps to publish Angular application the GitHub pages.

How to use Angular Lifecycle hooks

A component has a lifecycle which is managed by Angular. Below are the Angular component life cycle hooks:

  1. Create
  2. Render
  3. Create/Render child components
  4. Process Changes
  5. Destroy

Angular creates the component then renders it. After that it get the creates and renders its child components. If there are any changes in component’s data bound properties then processes changes and at last destroys it before removing its template from the DOM.

Angular provides a set of lifecycle hooks and below are few of them:

  1. OnInit – it is used to perform component initialization and it is used to perform any component initialization after Angular has initialized the data bound properties. It is a good place to retrieve the data for the template from a back-end service.
  2. OnChanges - It is used to perform any action after Angular sets data bound input properties.
  3. OnDestroy – This lifecycle hook to perform any clean-up before Angular destroys the component.

Using Angular Lifecycle Hooks

To use a lifecycle hook, you have to follow the below steps:

Implement the lifecycle hook interface

Angular provides several interfaces you can implement, including one interface for each lifecycle hook. For example, the interface for the OnInit lifecycle hook is OnInit.

export ProductListComponent implements OnInit {
Import Lifecycle hook from Angular packages

You have to import the lifecycle hook interface. Include OnInit in the import statement with Component as below

import { Component, OnInit } from '@angular/core';
Implement lifecycle hook method

After that you have to implement lifecycle hook method. Lifecycle hook interface defines one method which has name prefixed with ng with interface name. For example, the OnInit interface hook method is named ngOnInit.

ngOnInit() { // Some code here } 

Complete component declaration:

import { Component, OnInit } from '@angular/core';

@Component({
  selector: 'pm-products',
  templateUrl: './product-list.component.html',
  styleUrls:['./product-list.component.css']
})
export class ProductListComponent implements
{
       constructor() { }
      ngOnInit() { }
}

In this you can use another Angular Lifecycle hooks to implement required functionality at particular event.

Create a simple HelloWorld application with NativeScript

What is NativeScript?

NativeScript is a framework that let you to build cross-platform, native iOS and Android apps without web views. Use Angular, TypeScript or modern JavaScript to get truly native UI and performance while reusing the skills and the code from your web projects. Get 100% access to native APIs via JavaScript and reuse of packages from npm, CocoaPods and Gradle. Open source project maintained by Progress.

Getting Started With NativeScript

To get start with NativeScript, It require setup NativeScript CLI on your system. There are two way to setup NativeScript CLI, Quick Setup and Full Setup. Go through the System Requirements and CLI Setupdocumentation of NativeScript to set up your system.

Information Source - Set Up Your System

I am on a Widows 10 machine so I followed the Full Setup approach and followed below setup install all prerequisites to start with NativeScript:

  1. Open command prompt as an administrator on you system.
  2. copy and paste the script below into your command prompt and press Enter:
    @powershell -NoProfile -ExecutionPolicy Bypass -Command "iex ((new-object net.webclient).DownloadString('https://www.nativescript.org/setup/win'))"

Note: Please be sure that you run this command in cmd as an administrator (Windows key > type "cmd" > right click > Run as Administrator).

After the installation, your system will have following tools available:

  • The latest stable official release of Node.js (LTS)
  • Google Chrome
  • JDK 8
  • Android SDK
  • Android Support Repository
  • Google Repository
  • Android SDK Build-tools 28.0.3 or a later stable official release
  • Android Studio
  • Set up Android virtual devices to expand your testing options

The two environment variables JAVA_HOME and ANDROID_HOME are required for Android development, which should have automatically added as part of the installation:

Creating first program using NativeScript

tns create HelloWorld --template https://github.com/NativeScripting/template-ng-getting-started-hello

Now open project in the Visual Studio code using below command:

cd HelloWorld 
code .


image

It will open the project in the Visual Studio Code. Now you can edit the project file and also can add some plugin for NativeScript Angular snippets.

Running the Application

If you do not required libraries in the project folder then use “npm install” command to download the dependencies.

You can now bundle your project by passing --bundle flag to NativeScript

CLI commands:

- tns build android --bundle

- tns build ios --bundle

- tns run android --bundle

- tns run ios –bundle

Run the command “tns run android –bundle” to test your first application in the emulator.


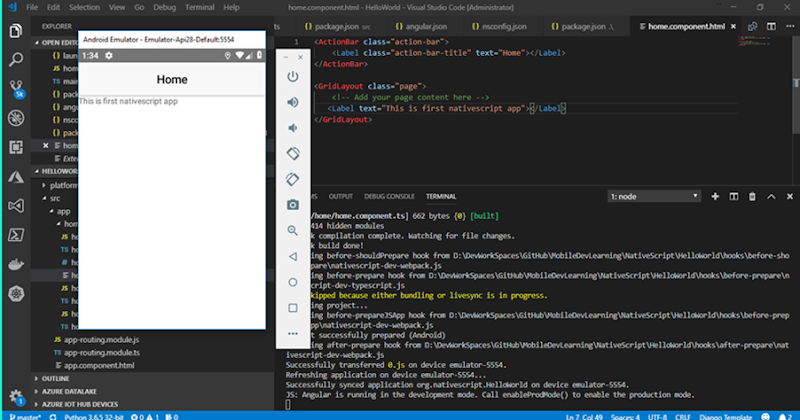
It is all done with creating a simple application in using the NativeScript.

Introduction to Angular 4 and TypeScript- Your First Angular App

clip_image001
In this article, you are going to learn that how to create and run an Angular application using Angular CLI.

TABLE OF CONTENT

  • Introduction
    • What is Angular?
    • Why do we need Angular?
    • Architecture and Building Blocks of Angular Apps
  • Setting Up the Development Environment
  • =>Your First Angular App
  • Structure of Angular Projects
  • Webpack
  • TypeScript Fundamentals
    • What is TypeScript?
    • Creating First TypeScript Program
    • Declaring Variables
    • Types
    • Type Assertions
    • Arrow Functions
    • Interfaces
    • Classes
    • Objects
    • Constructors
    • Access Modifiers
    • Access Modifiers in Constructor Parameters
    • Properties
    • Modules
  • Angular Fundamentals
    • Creating Components
    • Generating Components Using Angular CLI
    • Templates
    • Directives
    • Services
    • Dependency Injection
    • Generating Services Using Angular CLI
  • Exercise

Introduction
Angular CLI is the new approach to work with Angular. It helps to create new projects as well as deployment of the packages through command line interface(CLI). In this article we install Angular CLI using node package manager and then create a new Angular 4 project.


Creating a new Angular Project
To create a new Angular project, first you must setup your development environment and the Angular CLI which can be configured using below command.

npm install -g @angular/cli

Now open the command prompt and go to the directory where you want to create your first Angular application. Now run below command on the command prompt.
ng new Angular4App

clip_image002

After ng new xxxxxx, this xxxxxx is the application name which all depend on you that what you want to name your application.
Now open current project folder in Visual Studio Code by running below command:
code .

clip_image004

Finally, it is the time to check if your newly created application is running or not. To run your first application switch back to command prompt and run “ng server” command within project directory. Below is the command to run the Angular server which package and load the current application on the server so that you can run it in the browser.

ng server

clip_image006

After running this command, you will see in the output window where you will find that Angular live development server is listening on “localhost:4200” So go to the browser and type “localhost:4200” and you will find that your application is running as seen in above image.

Along this you will see a message in last that webpack: compiled successfully. In the next article We will discuss about webpack and project structure.

Conclusion
In this article you have learned to create and run an Angular project using Angular CLI.

Previous: Setting Up the Development Environment Next: Structure of Angular Projects